
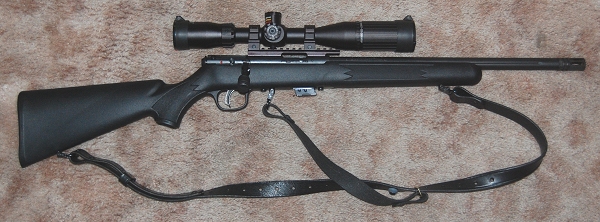
Savage is well known for its line of centerfire and rimfire rifles. In my opinion the "sleeper" of the rimfires is the current AccuTrigger MKII FV-SR. This short, handy, very accurate, and relatively inexpensive rifle is a joy to own and shoot. Not to mention their first rate customer service.
Please note that I am NOT an employee of Savage Arms nor one of their distributors and I have no official "pull" with them,
nor can I help you with special orders and the like. However, in the interest of camaraderie among Savage shooters, if you do
have a problem or a question not answered on this page, I'll be glad to see what I can accomplish--but I make no promises.
| General Information | Field Reports | Tips & Tricks | Odds & Ends |
General Information
 |
|
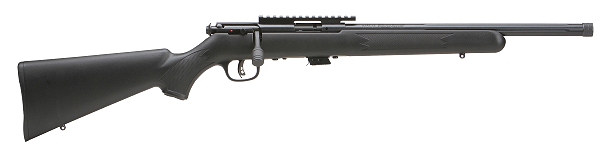
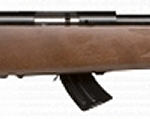
The MKII FV-SR as delivered |
Field Reports
This little gem is pretty much ready to go out of the box with the exception that the ones I have seen are pretty much free from any lube. As with any new firearm it's probably a good idea to disassemble, clean everything including the bore, and lubricate before its first use.
Reports on earlier versions noted that the rail mount screws were frequently loose as received but current samples seem to be tight and secure. If yours is, a little Loc-Tite fixes things.
The stock on the current versions has a fully floated barrel with no forearm contact, an improvement over some of the earlier versions where there was some interference, but the stock is still not fully stiff. This bothers some people.
The finish on the current version is excellent as opposed to some complaints about earlier rifles but there are still a couple of rough spots that need to be deburred internally--typical of all brands of firearms these days.
There have been some reports of problems with magazines not feeding properly but again current magazines are well built and seem to feed well. While a 10 round magazine is available it extends too far below the rifle to be really useful.
Several commentators have noted that stock drop is a little severe, resulting in more of a "chin weld" than a "cheek weld" especially with anything other than very low rings. Depending on your build and scope rings some padding may be needed for best eye placement. An accessory cheek piece would be nice to have available. A redesigned stiffer plastic stock with less drop and a stiffer forearm would be welcomed and would keep the weight down compared to wood aftermarket stocks.
The threaded muzzle accepts 1/2-28 threaded accessories, including suppressors. Now if .22 RF suppressors weren't so expensive, not to mention the $200 NFA tax ....
Tips & Tricks
Manual Copy
Click here for a pdf copy of the
manual.
Screw Torque
Factory torque specification for the action screws is 15 INCH /pounds
Scoping the MKII FV-SR
While some folks will spend more on their scope and rings than the rifle
itself cost, most of us can't afford that. In the interest of keeping the package costs
reasonable we looked for some low cost options and decided on a BSA
Sweet 22, 3 x 9, 40 mm, side focus scope with 1/4 MOA adjustment, and the parallax
adjustment runs from about 8 yards to "infinity." While BSA
doesn't generally have a reputation for exceptional quality or durability, the current version of this scope has
been a pleasant surprise. Beautiful matte black finish (the matches the
rifle's finish nicely), very crisp optics, and a duplex reticle that has a fine
center cross hair. The vertical adjustment knob is calibrated for the
drops of 36, 38, and 40 grain ammunition, but these are basically estimates due
to variances in the ammo and velocity obtained so it's nice but not to be relied on. It comes with a set of metal(!)
screw-in lens caps and a very nice screw-in metal(!) lens hood. If it is as
durable as it looks then BSA has really gotten their act together on this
scope. So far we have been very pleased.
The Butler Creek #20 (eye) and #29 (obj) covers fit this current version of the scope.
According to the factory, the reticle dimensions at 4X are: thick line, 2 moa; thin line, .75 moa; and the space between thick lines, 30 moa. At At the various powers available that translates as shown in the table below.
|
BSA Sweet 22 Reticle Subtensions in MOA |
|||
| Magnification | Thick Line | Thin Line | Space Between Thick Lines |
| 3 | 2.7 | 1.0 | 40 |
| 4 | 2.0 | .75 | 30 |
| 5 | 1.6 | .60 | 24 |
| 6 | 1.3 | .50 | 20 |
| 7 | 1.1 | .43 | 17 |
| 8 | 1 | .38 | 15 |
| 9 | .89 | .33 | 13 |
For rings we selected a set of of Leapers UTG low mounts. While inexpensive, once mounted on the rifle's rail they fit tightly and a check with an alignment rod showed as good an alignment and even contact as I have seen anywhere. My only complaint is that the cross bolt is round in cross section rather than flat which handles recoil better, but recoil really isn't an issue with a .22 rimfire. Just ensure that the cross bolts are against the front edge of the rail slots when mounting. (Scopes and rings want to move forward under recoil.) Their matte black finish matches the scope and rifle closely.
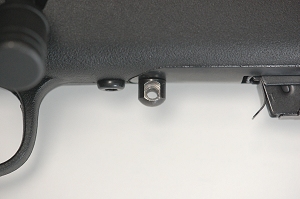
Installing A Ching Sling
The 3-point, fast loop-up Ching sling, is very popular on field rifles but requires a third
center swivel stud. You can get your Ching sling from Andy's Leather (www.andysleather.com).
Tell Andy that Fr. Frog sent you.
 |
|
Installed mid-position swivel |
To install the third swivel you will need the following items
Uncle Mikes 1/2" full thread (w/o enlarged shank) 10-32 swivel stud Brownells #080769131
also available in a single set from Midway as product #: 366960
Standard 10-32 nut to secure the stud
13/64" drill to drill clearance hole in magazine plate
#21 drill to drill a tapable hole in the stock
10-32 tap to thread the hole
Thread locking compound to secure the nut
Epoxy or a strong hardening glue to keep the swivel and nut from turning
Cold blue
Fine toothed hacksaw to trim the middle action stud (or can be done on a lathe.)
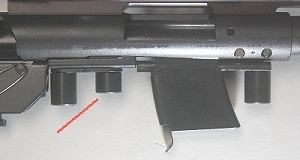 |
 |
| Trimmed center action stud | Secured swivel stud nut (right) |
Magazines
Magazines are frequently hard to find or "out of stock, so I recommend
getting a couple as soon as you can. I personally
prefer the 5 round magazines as the 10s stick out too far.
They are available in blue and stainless steel and the Savage part numbers are shown below.
| Capacity | Blued | Stainless |
| 5 | 90005 | 90007 |
| 10 | 20005 | 90008 |
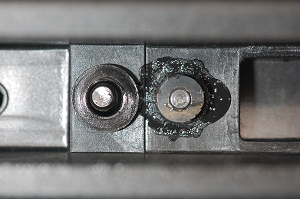
Extraction Issues
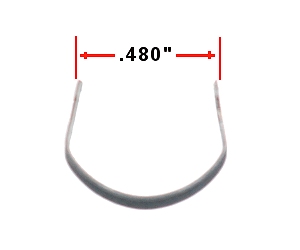
If you have weak or poor extraction, the extractor spring clip has probably weakened
or opened up. To fix, gently pry the clip off and remove the extractor and
cartridge guide. Clean out the slots for these parts and ensure there are
no burrs on either part. Do the same for the firing pin while things are
apart. Then gently
bend the two straight legs of the clip inward evenly, just a little. You don't
have to bend very much and a factory new clip measures .480" at the outside
of tip of the straight sections. The Savage part number is 702255.
 |
|
Extractor spring clip |
Install the firing pin and then install the clip with the notches towards the rear of the bolt, ensuring that it is fully seated. The clip should take a slight effort to push back on. Line up the notches in the clip with the slots and then insert the extractor into the left side (facing the bolt face) of the bolt face under the clip and push straight back into place. Repeat for the cartridge guide.
Bedding Issues
The topic of bedding a rifle is beyond the scope of this article, and
information is available on it everywhere. In all the samples of this
rifle that I have seen the barrel is free floated up to the receiver and the
receiver seems to be well bedded for a commercial plastic stock. If you
find yours isn't quite up to snuff a very neat fix can be done by using strips
of foil duct tape such as the Nashua 332 Multipurpose Foil Tape (Home Depot sku
#915245) on the stock areas
corresponding to the lower sides and
clear areas of the receiver. Once done, torque the action screws to
15 in/lb and verify that the barrel is still free floating for its full length
by slipping a strip of paper or a business card down the barrel.
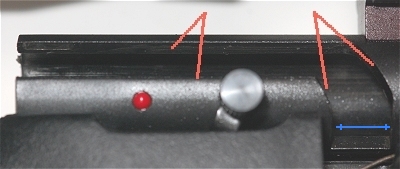
Bolt Lift and Smoothing
Because the rifle is in "tacticool" black the bolt has a dull matte
finish that is draggy even when lubricated. Burnishing the bolt body with
some 0000 steel wool and some oil or grease helps immensely as does lubing the
bolt raceway in the receiver. The edges of the bolt handle clearance cut
in the receiver are usually rather rough. Remove the bolt, stick a rag into the bolt way,
and use a small stone to smooth both sides of the bolt way flats and their bottom
and top edges. DO NOT touch
the areas indicated with the blue arrow. It is not necessary to achieve a mirror
shine, You just want to smooth the flats and remove burrs from their edges.
I'm surprised this isn't done at the factory.
You can also disassemble the bolt, and polish the internal and external surfaces. More on that later.
Trigger Issues
The current MKII FV-SR is fitted with Savage's nifty AccuTrigger system, but
the rimfire version does not seem as light nor as smooth as the center fire
AccuTriggers. However this too can be taken care of as long as you are
careful and understand what is what. (See below.)
How To Do It Instructions
These days, merely thinking about tweaking or tuning a firearms action or a trigger will
usually void your warranty, cause infectious diseases, and set the world spiraling
into "dramatic climate change" and cause the gruesome end of humanity.
However, if you are reasonably intelligent, careful, understand firearms
operation, and have some common sense (not all that common these
days), you can safely do most tweaks yourself.
A lot of "gunsmithing" information is available on the Internet but what I have seen varies greatly in quality and accuracy. I have two verified accurate, well illustrated, and detailed documents in MS Word format on tuning the trigger and smoothing the bolt on the current version of the MKII FV-SR. They are unofficial and not approved or authorized by Savage.
They are probably applicable, with a little thought, to earlier versions of the MKII.) If you will send me $5 to cover duplicating and postage costs, your address, and a note stating that ...
... I will send you both documents (total of 14 pages with illustrations). Requests without the disclaimer enclosed will be returned, less return postage. No exceptions.
Note that if you mess up, AccuTrigger parts are generally not available for replacement. You have been warned.
Please send requests to
John Schaefer
1365 S. Saddleback Dr.
Cottonwood, AZ 86326
Bore Smoothing
As with many barrels these days there can be some roughness in the
bore. Use a jag and a patch well soaked with KG2 bore polish and polish
the bore. Use several patches and be generous with the KG2. Run the patch
through the bore and back several times and repeat with several more
patches. You will feel the bore getting smoother and smoother and you'll
be amazed at the junk that comes out of even a new barrel. When done,
clean the barrel normally until you get a clean patch.
Odds & Ends
Flash Suppressors
Because of the blinding flash and blast ![]() of the
.22RF, and this being a black "tacticool" rifle with a 1/2 28 threaded
barrel, one can fit any standard M16 flash or noise suppressor to the barrel. Because
they are almost the same diameter as the MKII's barrel the standard M16A2 flash suppressors actually look rather
nice, especially if finished to match the rifle. For some reason this flash hider seems
to moderate the "muzzle blast" a little. You may need to use "peel
washers" to get proper alignment. It does not seem to affect
accuracy.
of the
.22RF, and this being a black "tacticool" rifle with a 1/2 28 threaded
barrel, one can fit any standard M16 flash or noise suppressor to the barrel. Because
they are almost the same diameter as the MKII's barrel the standard M16A2 flash suppressors actually look rather
nice, especially if finished to match the rifle. For some reason this flash hider seems
to moderate the "muzzle blast" a little. You may need to use "peel
washers" to get proper alignment. It does not seem to affect
accuracy.
 |
 |
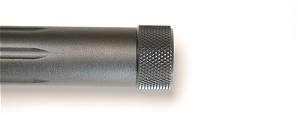
| Standard thread protector | M16 flash suppressor |
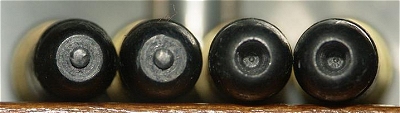
Improving Ammunition
Match ammunition aside, it has been my observation that "standard
velocity" rimfiire ammunition is significantly more accurate beyond 35 - 40
yards than "high velocity" ammunition due to it's velocity going
trans-sonic. However, even bulk HV .22 rimfire ammunition can be quite accurate if sorted by
weight. Simply set up your digital scale and sort your ammo by weight in
.1gr groups and then keep the batches separate. Doing this you'll be
surprised just how much your groups shrink. The other thing is to sort by
rim thickness, although this has a greater noticeable effect with match
ammunition or previously weight sorted ammunition. SAAMI specifications
are given below.
|
.22 Rimfire SAAMI Specifications |
|
| Rim Thickness | .036" Min .043" Max |
| Headspace | .043" Min .051"Max |
Interestingly, actual rim thickness measured on live rounds seems to vary greatly. I have seen as low as .035" and as high as .048" with the majority falling in the .039" to .041" range. Ideally you want minimum headspace, but adjusting headspace on a .22RF is a non-trivial exercise so you usually just have to live with what you have.
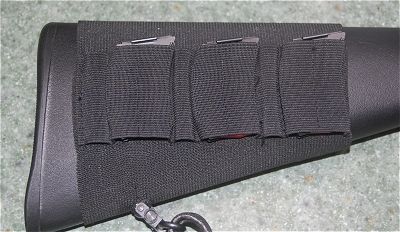
Spare Magazine Carrier
You can take an inexpensive elastic rifle cartridge butt cuff and carefully cut
the stitching between every two loops to make a very inexpensive on-gun magazine
carrier that can carry several 5 or 10 round magazines. The one pictured was
made from a $4.29 Allen
buttstock cartridge carrier, from Amazon. After removing the
appropriate stitches and positioning on the butt stock, mark where the swivel
stud is located and burn a hole through the elastic with a soldering iron to
melt the edges of the hole (to prevent unraveling).
22RF Informational Web Site
There is an excellent .22 rimfire technical site called "Rimfire Research and
Developmen,t" run by Steve Boelter at www.rrdvegas.com.
It was down for a while but it appears to active again.
It is chock full of excellent, informative, and well researched and documented
articles on everything from cleaning to ammunition modifications.
The site's article on cleaning is also available at http://www.ssvtexel.nl/index.cfm?act=files.download&ui=C5C9D865-2200-0A21-B5F5CF897974784F
as a pdf file.
After Market Triggers
Rifle Basix (eabco.com/Savage-Triggers.html)
makes an excellent replacement for the Savage rimfire AccuTrigger (called the Savage Rimfire
Adjustable Trigger
or "RAT", that eliminates the inner AccuTrigger trigger lever and reportedly allows a pull
weight of 1.25 to 4 lbs. It fits all AccuTrigger MKII rifles including the
M93. They also have triggers for non-AccuTrigger Savage .22s
Ammunition
Match
ammunition aside my favorite .22RF rounds are listed below (in no particular
order) but nowadays we grab
what we can.
Federal 36 gr CPHP-HV bulk pack (#745) - 555 bulk pack
Federal 40 gr LRN Standard Velocity Gold Medal (#922A)
CCI MiniMag 40 gr CPRN-HV (#0030) or 36 gr CPHP-HV (#0031)
CCI 40 gr Quiet 22 (#960)
CCI Subsonic HP (#0056)
CCI 22Long CB 29 gr LRN (#0038)
CCI 40 gr LRN Standard Velocity (#0032)
CCI 45 gr LHP Suppressor (# 957)
Bullet Forming Tools
There are several bullet forming tools available for the .22RF that can
uniform and reshape the lead bullet for better accuracy and terminal
performance. PACO, D-Rock, and Walts all offer these tool. After
playing with them I settled on the Waltz tool. While it is the most
expensive it is, in my opinion, the handiest and easiest to use as it fits a
standard reloading press and comes with a shell holder and 2 tip shapes (why
you'd need more is beyond me). I have observed a definite and significant
decrease in group size with most ammo using this tool. It works great in the LEE hand
presses while watching TV.
The PACO tool while the simplest and least expensive uses a hammer to form the bullets and there is no positive stop to control the shaping. The D-Rock tool has numerous tip configuration but requires an arbor press to use, and I have never received any response from them to my numerous queries via email and postal mail.
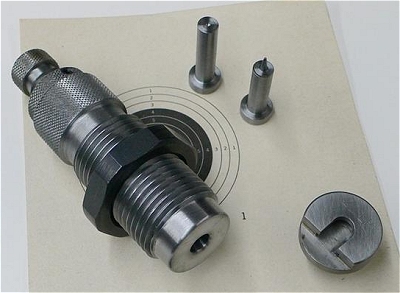 |
 |
| The Waltz dies w/shell holder and tip punches | Nose shapes from the Waltz die. |
The Waltz die is available from
Neal B. Waltz
4105 Hyatt NW
Massillon, OH 44646
WALTZ@SSSNET.COM
After Market Stocks
Boyds (www.boydsgunstocks.com)
make some very nice wood stocks, both laminated and solid, for the MKII
rifles. They are available in numerous styles and colors, in both drop-in
and semi-finished. They have bottom metal (which is required for the wood
stocks. Note that their website is very slow.
Sharp Shooter's Supply (www.sharpshootersupply.com ) also has aftermarket wood stocks for the MKII that include bottom metal. They have stocks for all Model 93R, 93R17, Mark I and Mark II rimfire models.
Rheinland Arms (www.troupsystems.com) also offers an interesting stock for the MKII patterned after the Accuracy International sniper stock
If you would like to see pictures of other folk's MKII builds or would like to submit a photo of yours, click here. No names will be posted.
Picture of the stock MKII and the Savage logo copyright © 2014 by Savage Arms and used with permission. All other photos copyright © 2022 by Fr. Frog and Hoover the Cat
Please email comments or questions to Fr. Frog by clicking here.
| Back to Fr. Frog's Home Page |
Disclaimer
As far as I know all the information presented above is correct and I have attempted to ensure that it is. However, I am not responsible for any errors, omissions, or damages resulting from the use or misuse of this information, nor for you doing something stupid with it. (Don't you hate these disclaimers? So do I, but there are people out there who refuse to be responsible for their own actions and who will sue anybody to make a buck.)
![]()
Updated 2022-05-27 @ 1844
You are visitor