 |
|
| Before | After |
This section contains brief discussions of various ballistics and shooting related topics as requested by correspondents. If you have a question you have been trying to find an answer to (keep 'em ballistics and shooting related--see your minister for the mysteries of life) email me by clicking here and I'll do my best to find the answer for you and if it is of general interest, publish it here. If you can contribute additional input to one of the answers I'd would appreciate hearing from you too.
Check back frequently as new topics are always being added.
On this page:
What can I do to make my firearm(s) more
reliable?
What is MIL 63460 that is see on some gun care products?
Do you have any suggestions for refinishing GI ammo cans?
What is the best pistol shooting stance?
What tools do I need to maintain my firearms?
Can you give some background on the problems with the
M16 after it was first adopted?
How good is the Russian steel cased ammunition now available?
How tightly should I torque the stock screws on my
rifle.
How do I compute what height scope rings I need for my scope?
What is the difference between a first and
second focal plane riflescope?
How can I safely clean the optics on my
firearms?
The bullets of my military surplus ammunition take a
magnet. Are they armor piercing?
How can I safely dry fire my .22RF?
How can I decap Berdan primed cases?
What effects the intrinsic accuracy of a bullet?
Q. What can I do to make my firearm(s) more reliable?
A. While a lot depends on the particular firearm there are some general things that apply to all. Keep in mind that most firearms designs are very reliable to start with, when built as specified. It is when production and quality short cuts are taken that problems arise. In the "good old days" a lot of attention to detail was taken in the manufacture of firearms. Nowadays corners are frequently cut in the name of saving a few pennies, necessitating some of the steps below.
Deburring - As they come from the factory most parts and internal surfaces have very sharp edges, small burrs, and machine marks that increase friction. Inspecting and deburring/polishing edges and flats will make everything run smoother. Note that it is not necessary to have a mirror shine--just use a fine stone or paper to remove any roughness. Check any place parts rub together or ammunition passes over/through. Mag lips, feed ramps, chamber mouths, chambers, breach faces, extractors, ejectors, bolt faces, action rails, etc. all need to be inspected. One thing you can do is to run a couple of hundred rounds through a new firearm and check to see where things are getting shinny and note any malfunctions and then remedy them.
Extractor tension and shape - Ensure that your extractor has the correct tension and that there are no razor edges. While specs vary, if you can put a cartridge under the extractor claw with minimal effort and it will stay in place if the bolt or slide is rotated you are probably close enough. (With spring plunger ejectors you will probably have to remove the ejector to do this.)
Lubrication - Most firearms are either under or over-lubricated, not to mention being frequently lubricated in the wrong places. Besides the obvious rotating and sliding parts, look for any shinny areas on parts and lightly lube them there. The brand of lube you use is of practically no importance compared to lubing the right places.
Springs - Weak action and magazine springs are a major source of problems. Spring quality control these days is frequently "iffy." Get a feel for the stiffness of new springs and/or learn your spring's length tolerances, and replace as necessary.
Gas systems - Clogged gas systems on gas operated firearms can be a real problem. If you shoot blanks or lead bullets, or simply just shoot a LOT of ammunition inspect your gas piston/tube/parts for fouling or stickiness. They are usually best left dry, but follow the manufacturer's recommendations.
Magazines - Bad magazines are probably the biggest cause of reliability problems and many cheap magazines are made of soft or un-heat-treated material. Keep them clean. Inspect the feed lips and bodies for damage, and check spring tension on a regular basis. Leaving magazine fully loaded for extended periods does no harm as springs fatigue from flexing and not static compression. Occasional rotating of ready mags doesn't hurt. Use quality magazines. Trash bad mags or distinctively mark them and relegate them to practice use only.
Cleaning - Finally, don't forget to simply clean your firearms. There are a couple of gun writers who seem to brag about the fact that they've never cleaned their guns. My question is WHY would you do that rather than clean them. Sure, maybe they still (for now) work, but what happen if that "one more little spec of gunk" seizes things up just as the carnivore or VCA (violent criminal actor) take a bead on you. Also, the gunk can get into places and make the action of the mechanical safety iffy. Done shooting for a while?. Clean, inspect, and lube your firearm! Simple common sense (of which their doesn't seem to be much these days).
If you don't take care of your equipment
it won't take care of you when you need it.
While you might not need it often, when you do need it you'll likely need it very
badly.
In discussing reliability with some serious operator friends of mine the consensus seems to be that reliability issues are caused by (in order of most to least common) ("1" and "2" were almost a tie.)
1) Magazine issues. Dirty, dented, bad feed lips, bad springs
2) Dirty weapon or lack of proper lubrication
3) Bad ammo
4) Broken parts
Q. What is "MIL 63460" that is seen on some gun care products?
A. MIL 63460 is the military specification for the performance of "Cleaner, Lubricant, and Preservative" products (CLP) for weapons and weapon systems - a catch all phrase for a product that can be used to clean as well as lubricate and preserve a firearm (3 lies for the price of one). It among things specifies the manner of testing and the standards that must be met. While not having a MIL 63460 certification doesn't mean a product isn't any good, it does help give an idea of its characteristics. Note that this spec is for "CLP" products only and does not encompass standard lubricants or cleaners Among the things specified are:
Temperature Range: -51 to +71 degrees C (-60 to +160 degrees F
Composition: No graphite or powdered metals, no ozone depleting chemicals
Toxicity: No adverse health properties when used as intended
Color & Appearance: Uniform in color and no visible residue when shaken
Physical Properties: See table below
|
Properties |
Values |
|
Flash Point, min |
65 °C (149 °F) |
|
Pour Point, max |
-59 °C (-74 °F) |
|
Viscosity, Kinematic (w/ solvent) @ +40 °C (104 °F), min |
14.0 cSt |
|
Viscosity, Kinematic (w/ solvent evaporated) @ -40 °C (-40 °F), max |
5000 cSt (see 6.7) |
|
Wear Preventive Characteristics, avg., Scar Diameter, max |
0.8 mm |
|
Falex Load Carrying Capacity, Jaw Load, min |
500 lbs |
Additional requirements for corrosion, permanence, and other items are contained in the specification. The complete document is available by clicking here.
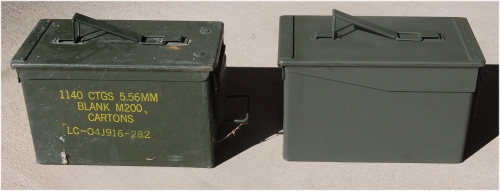
Q. Do you have any suggestions for refinishing GI ammo cans?
A. I have had excellent results using Krylon brand "fusion technology" ultra-flat camouflage paint, "#4293 Olive." This paint sticks better than anything else I have tried and provides a durable and attractive matte finish. It is available in the following colors.
|
Color |
Part # |
| Black | 4290 |
| Khaki | 4291 |
| Brown | 4292 |
| Olive | 4293 |
| Sand | 4295 |
| Lt. Green | 4296 |
http://www.krylon.com/products/camouflage_paint_with_fusion_technology/
Walmart carries it but it appears to be a (hunting) seasonal item at my local store.
While you can just clean the ammo cans and spray, for a like new appearance I have had great luck with the following procedure.
Remove the lids. Using fine sandpaper or fine steel wool and paint thinner scrub off any markings on the can until they no longer feel raised. Then lightly sand any scratches in the finish until smooth. Wash the cans and lids in mild soapy water and allow to dry thoroughly. Spray on 2 coats as per the paint can's directions insuring that you cover all surfaces including under the handle. Allow to dry for 24 hours. When painting the lids mask off the rubber seal inside the lid to prevent any paint from getting on it which will prevent a good seal.
|
|
| Before | After |
Q. What is the best pistol shooting stance? Weaver, isosceles, or "modern" isosceles
A. The debate will probably range on forever, but from a realistic perspective there really isn't a lot of difference in effectiveness. The various proponents of other than Weaver claim faster split times (time between shots) for their techniques but the time differences, if any, are in the hundredths of a second and they are generally not using what most would call "full power" loads. In competition that time may make a difference, but in the real world a tenth of a second (and many folks say up to about a half second) has no real advantage and will not give you any tangible benefit. The true isosceles where both wrists are bent sacrifices recoil control (unless you are very strong) and the so called "modern" isosceles which has an unbroken gun hand wrist and a support hand tension torquing the pistol against recoil generally feature a fairly square to the target stance which can be unstable, and some find uncomfortable. The classic early Weaver used a very severe blading to the target and was very solid but the more modern Weaver has less blading but is still very solid. One should use what works best and is most comfortable for YOU and let the gamers argue about the superiority of their stance.
Q. What tools do I need to maintain
my firearms? ![]()
A. The answer to this can get out of hand if we include model specific special tools for advanced work (a.k.a. depot level maintenance). However a basic kit should include the following items.
The items in the "tools" list are available from Brownells
* Harbor Freight sells a very nice 1/4" drive inch/pound torque. Their stock numbers are 61277, 63881, or 2696 depending on the exact model. Depending on their various sales the price ranges between $12 to $25.
A drop rod is just a slightly less than bore diameter aluminum rod about 6 inches long. (I use sections of old aluminum cleaning rods.) After cleaning and reassembling your firearm, you ensure that it is unloaded, cock it and drop the rod down the bore. Then, holding the barrel vertically pull the trigger. The rod should jump out of the barrel. (Note that on striker fired pistols like the Glock and M&P the rod may not come all the way out of the barrel.) This is sometimes called the "pencil test" because many pistol users simple drop a pencil down the barrel to do this test. It shows that the firing pin is striking the primer with enough force to work.
Q. Can you give some background on the problems with the M16 after it was first adopted?
A. Before getting into this subject it is well to keep in mind that all of our military weapons have been plagued with initial problems, including the M14, the vaunted M1 Garand, and the M1903 Springfield.
As first introduced to the market the original AR-15 had a conventional 1:14 twist barrel as that was the twist used in commercial .22 centerfire barrels. Unfortunately the longer M193 FMJ-BT bullet was barely stable at normal temperatures and completely unstable below about 40 degrees F with this twist. In spite of the manufacturer's hype to the contrary at low temperature most rounds would not stay on target at 100 yards. It took publication of tests by the NRA to get this noticed and the rifling was then changed to 1:12 and stability problems ceased. The rifling twist change DID NOT affect the lethality of the cartridge, contrary to the rumor mills.
When originally issued by the military as the M16 a whole bucket of screw ups occurred.
First, it was claimed that the rifle did not need to be cleaned and in fact cleaning supplies and lubricants were not even issued at first. (Interestingly, the manuals for all previous small arms specified daily cleaning and lubrication.)
Second, the barrel and chamber were bare steel and while that might suffice in dry areas, in the the humidity of Vietnam rust and corrosion resulted and were exacerbated by the small diameter of the bore and chamber. (Refer to the "no cleaning" above.)
Third, the rifle was designed around a non-canister IMR (stick) powders, 4475 and 8208M, which operated the action properly and at the correct design pressures. In an effort to make high speed ammunition manufacturing easier the military, without checking with the designer, changed to a non-canister ball powder, WW846. While it met chamber pressure and velocity specifications the port pressure (gas system) was much higher than the design specs called for, resulting in much faster and more violent cycling of the action, which caused extraction and wear issues. In addition it was found that the new 846 powder generated very high levels of fouling to the point that it clogged the gas tube and fouled the bore and chamber.
To correct these problems cleaning and lubrication supplies were issued and training started. The barrel and chamber were hard chrome plated to resist rust and corrosion, and a change made to the buffer system to reduce cycling speed. However, the fouling problem continued. Further investigation by Frankford Arsenal, documented in their report Report R1936, M16 Rifle Gas Tube Fouling - Composition, Properties, and Means of Elimination, by L.Stiefel & B. Brodman, August 1969, determined that the level of calcium carbonate (CaCO3) use in the powder manufacturing process was way to high (up to 0.9 percent of the components). Calcium carbonate was used as a stabilizer and as a storage life enhancer. When the calcium carbonate was lowered to, or below, 0.25 percent the fouling issue disappeared without adversely affecting the stability or life of the powder or its other characteristics. (Winchester/Olin subsequently reduced the CaCO3 content of their ball powders across the board.). Currently 5.56 mm ammunition is loaded with WW844, a non-canister powder effectively identical to the improved 846.
These changes turned the M16 into a much more reliable rifle. Interestingly the military, ever obsessed with white glove cleanliness insisted that only minimal lubrication should be used and it began to be noticed that in dry dusty environments and for that matter in normal use that reliability was still not what was desired. Numerous independent tests and combat/range experience over the years showed that the M16 can run just fine when quite dirty if heavily (meaning WELL lubed, not dripping) lubed rather than dry, even in dusty conditions. The "heavy lube" idea was recently (July 2010) acknowledged by the military. Tests showed that heavily lubricated M4s and M16 have 94% fewer stoppages than lightly lubricated ones even in dusty conditions.
The current 14.5" barreled M4 carbines run at quite high port pressures, especially with the M855 and MK 262 rounds because of the shortened gas tube which brings back the fast cycling problem. To counter this a different, heavier buffer and action spring are used. A stronger extractor spring along is fitted along with the use of a rubber insert and a rubber doughnut to increase extractor tension. (Why they didn't use a "mid-length gas system is still a puzzle to me.)
Addendum 2013-09-20: The jury is still out with the Army's adoption of the new M855A1 round that operates at still higher pressures than the M855 (62 kpsi vs. 58.7 kpsi). What its effect will be on the M4 carbines is not known.
There have also been some stories about M4 carbines getting so hot from sustained firing during a long firefight that they seized up. What happened was that they were fired well past their designed limits (45 rounds per minute in semiautomatic; 90 rounds per minute burst or full auto, with a sustained rate of fire (continuous) of 12 - 15 rounds per minute. This problem would have also occurred with the full sized rifle under these conditions too. To help alleviate this problem some additional changes have been made to the M4 including a much heavier barrel under the handguard and the new version was fielded as the M4A1.
Q. How good is the Russian steel cased ammunition now available?
A. The relatively inexpensive steel cased, Berdan primed ammunition now available from several sources appears to be of good quality and more than acceptable accuracy for training and practice use. Available with lacquered, brass plating, zinc plating, or a polymer coating, the general consensus seems to be that the zinc plated variations are preferred. The old lacquered and early polymer coating seem to have had problems with hot chambers as would be encountered in full auto or heavy semi auto fire, but supposedly the polymer stuff has been improved. The brass plated variations are probably fine too but I have received several reports of the "greenies" (green corrosion).
I and some associates have put several thousand rounds of the zinc plated .223 ammo through several rifles without a single problem other than it seems to be slightly dirtier than most US ammo. It does seem to leave a metallic residue in the bore, that appears to be pieces of the steel bullet's plating, but it cleans out just fine. Your mileage my vary but I have no real qualms about using it other than the fact that you throw the empties away--something that makes a reloader cringe even though the cases aren't reloadable. As to what to do with the empties, a friend suggested melting down the steel and making a firearm. ;-) I personally believe that steel cased ammo is not a problem. If you run to paranoia I would check your extractor now and then and make sure it is in good shape initially.
A friend did some hardness testing using a diamond-drop hardness tester and found that brass case ammo ran about Brinell 80 - 90 and Wolf steel case was only about 20% harder at Brinell 100 - 110. AR extractors seem run about Brinell 120. ATK is currently developing steel cased, polymer coated ammo for the US military, and the cases would be Boxer primed and reloadable!
There is no difference in the force needed for the extractor ride over the rim of steel cased ammo than for brass cases. Testing in an AR showed a range of from 5 to 6 pounds whether brass or steel cases of various types.
There are some concerns about the "bi-metal" or gilding metal clad steel (GMCS) projectiles causing bore wear. It appears that exclusive or heavy use of bi-metal bullets can reduce bore life (especially in the throat area). The wear starts in the throat because the GMCS bullets don't upset to seal the bore very well. The 5.56 mild steel jacket bullets gave about 65% of the barrel life compared to the copper jacketed bullets in 5.56 and about 80% in 7.62.
Requirements for 7.62 NATO specify a minimum barrel life of 5,000 rounds when fired in a chrome lined barrel in a machinegun in 125 rd bursts with a 4 minute cooling between bursts. "Failure" occurs when the velocity drops more than 61 ms from the initial MV, or 20% of the rounds in a burst show more than 15 deg of key holing at 25 m distance. GMCS is specified for M80 used for linked pack because they can get more rounds out of a barrel before it fails, as the steel gets a better bite in a worn, hot, barrel. Since not much 7.62 is shot in rifles these days almost all production these days is with GMCS bullets including most of the surplus "XM80" ammo.
The only problem with the Russian ammo I have seen is that the pressure curve for some lots is a little erratic, which would indicate that the powder used isn't a good match for the cartridge and bullet weight. However, they seem to function fine.
For an in-depth study of the steel cased ammo see http://www.luckygunner.com/labs/brass-vs-steel-cased-ammo/
Q. How tightly should I torque the stock screws on my rifle.
A. The main purpose for having a torque specification on an action screw is to offer the end user (who may not have the technical expertise or opportunity to verify that the action is properly seated in its stock) some sort of reference for the sake of expediency.
It is well known that the tightness of the action screws can have a dramatic effect on the rifle's grouping. High precision shooters often start at about 30 INCH/pounds and slowly work up in small increments while shooting for group size at every setting. The group sizes will start shrinking and then dramatically open up when the screws are over-torqued. Normally the front screw should be tightened first and the rear screw second, but some manufacturers do the rear screw initially. The third screw (if present--that secures the front of the trigger guard) should just be lightly tightened (5 - 10 inch/pounds). Screws should be clean and free from grit before torquing. It is also a good idea to tap the butt of the stock on the floor to ensure the recoil lug is seated against the stock, prior to tightening the screws. The exact recommended amount of torque depends on the particular manufacturer. With threads that seat in aluminum receivers you do not want to exceed the torque specs due to the danger of stripping the threads in the aluminum.
Getting an exact torque is a somewhat iffy proposition. Torque wrenchs are typically ±4% of the indicated value, and the friction encountered varies depending on the surface finish of the fastener and the threaded hole it is going into. The number of times the fastener has previously been torqued, and the likeness of the external and internal threads are also factors to consider. In addition, the number of threads of engagement, material composition, as well as the amount and type of lubrication all need to be considered. As you can imagine, its virtually impossible to compute for these variables.
If you would like to read further on the ins and outs of "torquing" I suggest you pick up a copy of the "Machinists Handbook" which is available from Brownells (part # 435001010).
Below is a chart of current factory recommended torque specification for the action screws of their rifles which was obtained directly from the manufacturers February, 2012. Remember, as with the "Pirate Code" they are more like "suggestions.
Note that these factory settings are suggestions
and are not absolute (other
than generally being considered max).
Many rifles will give better groups at different
settings.
| Manufacturer's Action Screw Torque Settings | |||||
| BRAND | MODEL | FRONT | REAR | GUARD (if any) |
NOTES |
| Accuracy International | All | 53 in/lb | 53 in/lb | -- | |
| Browning | Wood or synthetic stocks | 40 in/lb | 40 in/lb | Snug | |
| Stocks with bedding blocks | 65 in/lb | 65 in/lb | Snug | ||
| HS Precision | All | 65 in/lb | 65 in/lb | -- | |
| Kimber | All | 45 in/lb | 35 in/lb | not stated (snug) | |
| Remington | Early Sendero & Police rifles | 45 in/lb | 45 in/lb | Snug | confirmed |
| Sendero & Police rifles | 65 in/lb | 65 in/lb | Snug | confirmed | |
| Synthetic and Wood stock | 30-35 in/lb | 30-35 in/lb | Snug | ||
| Military M24/M40 | 65 in/lb | 65 in/lb | not specified | ||
| Ruger | M77/MkII/Hawkeye | 90 in/lb | Hand tight then backed off 1/8 turn | Hand tight then backed of 1/8 turn | |
| Scout | 90 in/lb | 10 in/lb | See note below | ||
| 77/22 .22RF/.22Mag | 50 in/lb | Snug | |||
| 77/.22 Hornet | 80 in/lb | Snug | |||
| Steyr | All except SSG08 | 65-70 in/lb | 65-70 in/lb | n/a | |
| Savage | Accu-Stock | 40 in/lb | 40 in/lb | Snug | Wedge screw 40 in/lb See note below |
| Any wood or synthetic stock | 30-35 in/lb | 30-35 in/lb | Snug | See note below | |
| Rimfire | 15 in/lb | 15 in/lb | |||
| Springfield '03 Rifles | All | 60 -65 in/lb | 60 -65 in/lb | Tighten front first | |
| Winchester | Wood or synthetic stocks | 40 in/lb | 40 in/lb | Snug | |
| Stocks with bedding blocks | 65 in/lb | 65 in/lb | Snug | ||
| Weatherby | Wood stocked | 35 in/lb | 35 in/lb | Tighten rear screw first | |
| Fiber & Accumark | 55 in/lb | 55 in/lb | See note below | ||
|
Ruger
Notes Savage Notes Weatherby
Notes |
|||||
The following are the recommended torques for Leupold and Burris rings and mounts
|
Leupold Mount Screw Torque |
|
| 6-48 Base Screws | 18 in/lb |
| 8-40 Base Screws | 28 in/lb |
| 8-40 Ring Screws | 28 in/lb |
| STD Windage Screws | 45 in/lb |
| Ringmount Keeper Screws | 45 in/lb |
| PRW Keeper Screws | 22 in/lb |
|
Burris Mount Screw Torque |
|
| Tactical Ring Tops | 20 in/lb |
| Tactical Cross Bolt | 65 to 100 in/lb |
For those of you with AR platform rifles the following are the official military torque settings per TM 9-1005-213-23&9
|
AR/M16 Torque Specs |
|
| Stock Tube (rifle) | 35-39 FT/lb |
| Stock Tube Nut (Carbine only) | 38-42 IN/lb |
| Barrel Nut | 30 FT/lb initially with moly coated receiver threads. Up to 80 Ft/lb permitted. |
| Flash Hider | Hand tighten plus 1/14 turn to align using washers |
| Carrier Key Screws | 50-58 IN/lb |
| Hand grip screw | No spec given other than use lock washer and heavy hand tighten. Depending on grip installed, max screw length is 1.125". Must not protrude into receiver |
A note: Torque wrenches, and in particular inch pound models can be very expensive. However, I recently found a very nice 20 - 200 in/lb torque wrench with a 1/4" drive at Harbor Freight and the 2 samples I have tested have been the equal of much more expensive units. They are frequently on sale for as low as $12 with a Harbor Freight catalog coupon, and are listed as item61277, 2696, or 63881
Calibrating Your Torque Wrench
It is easy to check the calibration of the adjustment. You will need a luggage scale, a
general scale known to be accurate (to weigh the test weights), and some weights
(cast bullets and alloy ingots work nicely).
(In this example for 50 inch pounds)
(In this example for 35 foot pounds.)
Q. How do I compute what height scope rings I need for my scope?
A. The procedure is actually not complicated, but it can be confusing because manufacturers use different measurements to give the "height" of the rings.
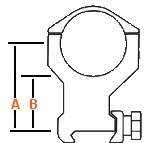
Some manufactures give the height as "A" which is measured from the contact point of the base to the center of the ring hole. (NOTE: The center of the ring hole is usually NOT exactly where the rings split.) Others give the height from the contact point of the base to the bottom of the ring hole
For rifles with a full length, barrel covering integral rail mount like the AR and Steyr Scout
As an example if you have a scope with an objective bell diameter of 2.27" you would need a mount with dimension "A" of a minimum of 1.135", plus about .1" (to provide clearance for a lens cap), to clear clear the top of the rail.
Bell diameter = 2.27"
2.27" / 2 = 1.135" + .1" = 1.235
If the available ring heights were .95", 1.25", 1.4', and 1.55' you would select the 1.4" high rings although the 1.25" would probably work.
If you are using a scope with a ring dimensioned like "B" take 1/2 of the tube diameter and subtract it from the 1/2 of the bell dimension. As an example if you have a scope with an objective bell diameter of 2.2" you would need a mount with dimension "A" of a minimum of .51" plus about .1" to provide clearance for a lens cap, to clear the rail.
Bell diameter = 2.2
2.2 / 2 = 1.1Tube diameter = 1.18"
1.18" / 2 = .59"1.1" - .59" = .51" + .1" = .61"
If the available ring heights were .25", .5", 75', and 1" you would select the .75" high rings
For conventional rifles where the barrel is a smaller diameter than the receiver plus mount
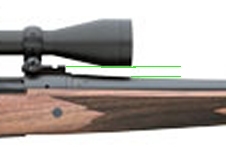
In the case of conventional rifles where the barrel is smaller in diameter than the receiver/mount height there are some additional steps.
As an example lets use the first ring computation from above with it's 1.235" bell plus .1" dimension. and a measured dimension from the bottom of the straight edge to barrel of .4"
1.235" - .4" = .835"
If the available ring heights were .95", 1.25", 1.4', and 1.55' you would select the .95" high rings.
If we were using the "B" dimensioned rings in the example above.
1.1" - .59" = .51" + .1" = .61"
.61" - .4" = .21"
If the available ring heights were .25", .5", 75', and 1" you would select the .25" high rings.
Q. What is the difference between a first and second focal plane riflescope.
A. In a first focal plane scope the reticle shrinks and grows in direct proportion to the target as you change the magnification settings, thus the reticle subtensions (the dimension of the various parts of the reticle on a target) are always consistent. This allows you to estimate the range to target at any power, unlike second focal plane scopes, which have to be set to a specific magnification in order to range accurately because the reticle subtensions in second focal plane scopes are only accurate at one magnification.
Because first focal plane scope reticles grow as power is increased and shrink as power is decreased the reticle must be chosen with care. At high magnifications certain reticles may appear "thick", obscuring the target, while very fine reticles may seem to disappear at lower magnification.
In a second focal plane scope the reticle size remains constant as you change magnification settings and you don't have to worry about the reticle appearing too thick or too thin . However, in order to "range" accurately the scope magnification must be dialed to a specific setting whatever magnification the reticle subtensions are calibrated at by the manufacturer. (See your manual.).
Q. How can I safely clean the optics on my firearms?
A. Modern lenses are remarkably tough but they need to be properly cleaned. I recommend the following procedure. You can use normal eye glass cleaning solution or the homemade version described at the bottom of my "homemade" page. Soft brushes and cleaning papers/cloths are available from most camera stores and micro fiber cloths are available free at most optometry places
Warning: Do not spray lens
cleaner directly on the lens. Do not use
normal cloths or paper towels to wipe lenses as they can contain gritty
substances.
Q. The bullets of my military surplus ammunition take a
magnet. Are they armor piercing? ![]()
A. Most likely they are not armor piercing. While most bullet jackets are made from a copper alloy, the use of a mild steel jacket plated with copper (gilding metal clad steel - GMCS) is seeing increasing use due to the high price of copper. As an example the US 7.62 mm NATO M80 ball can have a bullet jacket made to specification using either the 220 (90/10) MIL-C-21768 annealed copper alloy, or from copper alloy clad steel MIL-S-13468 which will take a magnet. Most of the European military ammunition now uses coppered steel jacketed bullets.
The 7.62 GMCS bullets gave about 80% of the barrel life compared to the copper jacketed bullets. In 5.56 the barrel life is about 65% for GMCS.
NATO requirements for 7.62 NATO specify a minimum barrel life of 5,000 rounds when fired in a chrome lined barrel in a machinegun in 125 rd bursts with a 4 minute cooling between bursts. Failure occurs when the velocity drops more than 61 ms from the initial MV, or 20% of the rounds in a burst show more than 15 deg of key holing at 25 m distance. The wear starts in the throat because the GMCS bullets don't upset to seal the bore very well.
GMCS is specified for M80 used for linked pack because they can get more rounds out of a barrel before it fails, as the steel gets a better bite in a worn, hot barrel. Since not much 7.62 is shot in rifles these days almost all production these days is with GMCS bullets.
In US military ammunition there is a ball 7.62 mm bullet that does have a full steel core. This is the seldom seen M59 Ball which has the normal copper alloy jacket and a 56 gr mild steel (QQ-S-637) core. From the drawings the core is identical to the core of the M61 AP round of but the AP core is made of hardened steel, G10700, MIL-S-12504. The NATO spec for 5.56 is similar, at 5000 minimum rounds barrel life, but I don't have the test conditions. We we were getting about 6,500 rd with the steel and around 10,000 with the copper jackets.
In US/NATO practice AP ammunition is identified by a black tip and frequently there is a cannelure just above the case mouth along with the black tip. Other countries may use different markings such a a green primer annulus on WWII .303 British, a blackened bullet on WWII German ammunition, and a black/red tip on current Soviet ammunition. If in doubt consult an ammunition identification handbook.
Q. How can I safely dry fire my .22RF
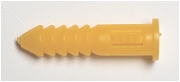
A. Dry firing most rim fire firearms will damage the mouth of the chamber because the firing pin hits on the edge of the chamber mouth. However, you can use #4 (usually yellow) plastic wall anchors as a dummy round and dry fire away to your heart's content. They also extract normaly.
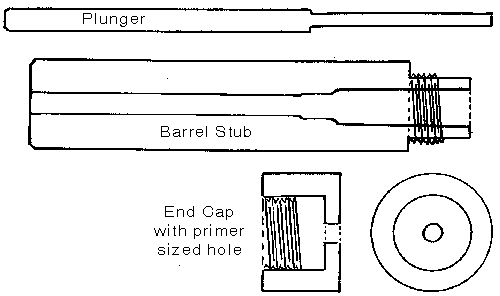
Q. How can I decap Berdan primed cases?
A. Berdan primed cases are not easy to be decapped but it can be done. You can use a small sharp pointed tool to pierce the primer and lever it out. In Europe, I have been told that the usual decapping method is to use a hydraulic decapping tool. This is basically a barrel stub with with a smooth bore and a chamber for the cartridge being decapped, with a threaded end cap with a hole to clear the primer, and a snug fitting plunger. The case is filled with water, inserted in the tool, the cap secured. The plunger rod which is a smooth fit in the bore is inserted in the tool and rapped with a hammer. The primer is popped out by the water pressure. The "chamber" of the tool keeps the case from bulging from the water pressure. See the drawing below. If you are planning on decapping a lot of Berdan primed cases this is probably the best method.
|
Q. What effects the intrinsic accuracy of a bullet?
A. Probably the most important part of a bullet's accuracy are the consistency of the jacket thickness and concentricity of the bullet and its core. Bullets spin at high speed (typically well over 100,000 rpm) and anything that affects its balance will have a great effect on accuracy. Second, is probably the squareness and evenness of the edge of the bullet's base (or the juncture of the boat tail and the bullet body). If this is not square, as the bullet exists the muzzle gas will escape unevenly around the base of the bullet, disturbing its flight. Third, is probably the consistency of the bullet's meplat or tip. While a surprising amount of tip damage doesn't matter inside of say 300 yards, at long ranges the tip size can have a great impact on the consistency of the ballistic coefficient which will effect bullet drop and thus vertical group size.
Please email comments to Fr. Frog by clicking here.
| Back to Q&A Index | Back to Fr. Frog's Home Page |
Disclaimer
As far as I know all the information presented above is correct and I have attempted to ensure that it is. However, I am not responsible for any errors, omissions, or damages resulting from the use or misuse of this information, nor for you doing something stupid with it. (Don't you hate these disclaimers? So do I, but there are people out there who refuse to be responsible for their own actions and who will sue anybody to make a buck.)
![]()
Updated 2019-10-28