I have often been asked what is the best method to develop a load for a firearm. On the surface, the task appears daunting as one seems to be faced with having to trying hundreds of combinations in different loading manuals to find one that works well in your particular firearm. However, as we will see, there is an easier way.
The following is based upon information in part from an article on chronograph usage by Jim Ristow, of RSI Software, and is excerpted here with his permission.
First a little theory
Every barrel develops harmonic vibrations when a cartridge is fired, similar to a string being shaken. A gun barrel's vibration can be described as a 3-dimensional sine wave, or corkscrew movement and is caused when the bullet is accelerated into a rapid spin by the rifling.
It is impossible to entirely eliminate barrel movement. Even a thick barrel's muzzle will move with every shot and any velocity variation will alter where the muzzle is located as the bullet departs. This random movement of the muzzle gives rise to increased group size. Most experienced gun builders agree it is best to allow a barrel to flex. The idea is if the barrel's movement can't be eliminated the next best thing is that it flex consistently. That's why good shooting guns usually have their actions and only the first inch or so of the rear of the barrel bedded tightly into the stock to hold the receiver firmly, with the remainder of the barrel free floated. In addition, short, thick barrels have wide(r) nodes so velocity isn't as critical to achieving a sweet spot.
Because the velocity of the bullet passing through the barrel affects the way it flexes accurate loads should deliver as consistent a velocity from shot to shot as is possible so that the bullet exits the muzzle at the same point in the "flex.". You can control this to a degree but it is impossible to entirely eliminate shot to shot velocity deviation. At around a variation of 10 to 12 f/s it may become almost impossible to reduce the effect any further.
It has long been understood that barrels perform best within certain velocity ranges. These velocity ranges are commonly referred to as a "harmonic nodes" or "sweet spots". The reason for this is that the tensile strength (or the ability to resist further bending) of the metal alloy increases as it moves further away from it's static state. The barrel gets stiffer when it is forced to the extremity of its movement. At the point of maximum movement, slight velocity variations change the muzzle location less; resulting in lower shot dispersion and thus a smaller group size. What most shooters don't understand is the harmonic vibration is related to the mass of the bullet. Therefore, once the harmonic node(s) for a given weight bullet is identified, a lot can be learned, if you know the velocity.
There is also a new theory of "barrel timing" being developed based upon data obtained from strain gauges. Upon firing the chamber swells slightly and an annular ring of expansion travels down the barrel causing the bore to expand slightly and this effect continues as the expansion reflects back and forth along the barrel diminishing with each passage. Initial data suggests that not only should a load perform best at one of the velocity nodes but that the bullet should not exit the muzzle at the same time that the expansion ring reaches the muzzle as the slight increase in bore size adversely affects accuracy. Research on this is continuing and as more data comes in I will add it to this page.
In the days of yore (BC -- before chronographs), it was necessary to blindly hunt for loads that worked. Once a good load was found, changing any component could render the whole process useless (since changing components varies pressure and velocity) and one pretty much had to start from scratch if anything changed. A chronograph provides direct insight into what your loads are doing, and what you need to do to make them work better. You will be able to immediately determine if a changed component produces velocity outside of the range the barrel likes. In most cases simply adjusting the powder charge will correct the problem.
Anyone who handloads really needs to have a chronograph, especially if they are serious about developing good loads. The best chronograph on the market is the CED Millennium 2 Chronograph. It is extremely accurate and stable, interfaces with RSI's Shooting lab software, and can be fitted with infra-red sensors which will "see" bullets under conditions (including total darkness) that would fail on other chronographs. While the CED is available from several sources, if you order it from RSI you will always get the latest model along with the serial computer cable and some extras. By the way RSI will provide full support for CED units purchased from other sources, including support for the serial computer interface port. To order a CED chronograph from RSI go to www.shootingsoftware.com and tell him that Fr. Frog sent you.

By the way.... If you own a chronograph of any make and are having problems getting it to work properly click here when finished reading this page for some tips.
Step1-- Initial Load Development
Lets start from scratch and assume nothing is known about a good load for a particular firearm. The only information we have is from load manuals. Also, time is valuable, since we probably don't have a range in our back yard. Even if we are lucky enough to have a place to shoot outside the back door, saving time by doing things efficiently lets us enjoy other things in life. We will also assume that your rifle's bore is clean and free from copper fouling, that your barrel's bedding is correct, and that all screws are tight on your rifle. Another thing to keep in mind is that it often takes several "fouling" shots from a clean barrel for velocities to stabilize so you should fire a couple of fouling shots before starting load development.
Most reloading manuals list their loads starting with the fastest powders and work down to the slower powders. The powders have been selected as suitable based in part on the loading density so any of the powders should work well. If you are starting out by having to purchase powder, select one of the powders in the middle or slow end of the loading data list suitable for the bullet you will be using. For more information on load density and its effect on performance see the in-depth article on RSI's site by clicking here.
At your reloading bench prepare your brass for reloading. Sort your brass by brand or military manufacturer/date head stamp. Clean, resize, trim (nominally to .01" less than the maximum allowable case length as specified in your load manual--the actual length is not as important as is the lengths being uniform), and prime about a 100 pieces of the same brand of brass with your favorite primer. (The brand of components you use are not important at this point as long as all the cases are the same brand or military manufacturer/date head stamp and you use the same primers and bullets for all the cases.)
Check your loading manual and determine the maximum charge suggested for your powder. Then determine how much adjustment on the powder measure will throw about 1 percent or slightly less of the weight of maximum charge of powder. (As an example, if the maximum load was 45.3 grains, you would determine the amount of adjustment of the measure that would give you about a 4/10 to 5/10 grain increment--often about 1/4 to 1/2 turn of the adjustment). Then, set your powder measure to throw a charge in the lower third of the charge weight range as recommended by your loading manual. Also note the maximum velocity indicated in your load manual so you have some idea of when you are approaching a maximum load.
Use your preferred method to set your seating die so that bullets will be seated 10 to 20 thousandths off the lands or to the workable maximum overall length if they will be used in a magazine fed firearm. It should be noted here that it may be a good idea to check your seating plug to ensure that it bears only on the ogive of the bullet and not the tip. Because bullet tips vary slightly in shape seating a bullet by means of its tip leads to varying seating depths. It may be necessary to alter the seating plug by drilling it out slightly so it bears only on the ogive. Some manufacturers will custom cut seating plugs for you.
Setting a seating die for the "overall length" should be done using on of the gauges that measure from the ogive and not the tip of the bullet. Sinclair and others make inexpensive gauges for this or you can fashion your own.
Head for the range with bag of primed cases, bullets, powder, powder measure, a single stage press, a seating die, and a "permanent" type marking pen. All you will be doing is throwing powder charges and seating bullets, so how you mount the press and measure so it is useable at the range is up to you. Some shooters just screw their stuff to a heavy wood plank. (For a nifty idea on this see the end of this article.) Of course, you will also be taking your chronograph, rifle rest and "sand bags," your notebook and pencil, and hearing and eye protection.
Load 5 starting rounds and slowly and carefully fire them at an aiming point through the chronograph (we assume you have good bench shooting technique). Record group size, the velocity and the standard deviation for the string. Increase the charge one "increment" by turning your adjusting screw on your powder measure as described above and shoot 5 more at a separate aiming point. Continue this process until you start seeing signs of high pressure or reach maximum velocity. If you get a really good group, load one sample round with that load and label it with the marking pen before adjusting the measure so you can weigh it at home later (or if you can weigh charges at the range do so and record the charge weight).
As velocities increase you should see obvious changes in-group size. It should be readily apparent when you reach a velocity node the barrel likes. However, don't stop at the first point where you get a tight group as most rifles have two or more nodes. As you pass through each node, groups will open up again until you approach the next node. Stop only when you are at maximum velocity or pressure. Once there, you should have identified rough velocity nodes for the bullet's weight. It's now time to get serious. If you can weigh powder charges at the range you can proceed there, otherwise it's time to head back to your loading room.
Step 2--Fine Tuning
At this point most of the drudge work has been completed and it is time for fine tuning. You should have a good idea of velocity nodes velocities but really have not shot "serious" loads. Pull the bullets from the sample loads that produced the best groups and carefully weigh the charges. Load at least 5 more rounds of each "node load" using your best reloading technique and another 5 each just over and under that charge (say 1/2 of the initial "increment). Return to the range with your loaded rounds to validate what you have learned and if possible also determine the velocity range/width of each node.
While loads at the different node velocities will probably all perform well, if you are developing a target load which you will be shooting a lot you may want to develop your load around the lower velocity nodes as a means of keeping throat erosion to a minimum. For a hunting load where you want to get maximum ranging and terminal performance concentrate on the higher velocity nodes.
Generally the thicker the barrel the wider the node. This is important when working up loads that will be effective during different times of the year. Here in Arizona, loads that work in 110 degree heat often perform poorly in the cooler winter months. Conversely loads identified in winter months often produce velocities that are too high to work during the summer. Most of this is due to changing interior ballistics due to temperature changes and not other differences in atmospheric conditions. By identifying the width of your nodes you should be able to find a load the works all year long. Simply use the high end of the node you are loading to if shooting in significantly colder conditions then when the load was developed, and load to the low end if shooting in significantly warmer conditions then when the load was developed.
As mentioned before, changing components will affect performance. Bullets of the same weight but different brand or shape will produce different velocities with the same powder charge. This is due to differences in jacket thickness, bullet bearing surface within the bore, gas seal on the base due to shape, hardness of core material, etc. If you change bullet brands in your load, once you determine the new bullet's velocity is above or below the previously identified nodes, all that should be required to make it shoot much better is to adjust the powder charge so the velocity is within the range your barrel likes.
Changing primers will also produce different velocities. Once you have identified what load your gun likes, it is simply a matter of adjusting the powder charge if you change primers. In the final accuracy analysis the only substantial difference between primers may be the thickness of their shells. There is, however, a difference in velocity they produce with a given powder charge--sometimes 50 f/s or more. Is there a real difference when charges are adjusted to deliver the same velocities? For all but the most die-hard benchresters, probably no.
Most shooters are familiar with the measurement called "standard deviation." Standard deviation (SD) is simply a statistical measurement of the uniformity of a sample of events. The standard deviation data provided by most modern chronographs will help identify good loads. While it is not always true that loads with the lowest SD produce the very smallest group, generally a good load will have a low shot to shot velocity deviation. (Velocity deviation can sometimes be controlled by seating depth, neck tension, flash hole deburring, etc., and these are things you can worry about after you get a good load and have some free time to play around with the really fine tuning.) The bottom line is, however, that if you don't have data for comparison, you cannot fine tune your loads.
Obviously the degree of care in loading, component quality, and shooter ability all impact group size. And, of course, not all guns are capable of shooting one hole groups--except those owned by some of the gun magazine writers. (Besides, if you want a 1-hole group just shoot once!) But, once you identify node velocities for a particular firearm with a chronograph, much of the guesswork in working up loads can be eliminated and a wide range of components can be made to provide satisfactory results. If you are happy with the load you can stop here.
If you are a stickler for details and want to wring the very best out of your loads you can go a little further with some detail work to ensure maximum uniformity of your final working load. Weigh 10 unprimed pieces of your brass and find the average weight. Then weigh all the cases and cull any cases that deviate by more than about 3/4 gr from the average weight, or sort them into batches by weight. Uniform the flash hole using a tool like Midway's controlled depth flash hole deburrer. Ensure that the primer pockets are of uniform depth (but don't ream the too deep) by using a pocket uniforming tool like Sinclair's. And then there is selecting the very best bullets.
For a more detailed look at what affects ammunition accuracy and information on bullet quality and how to determine the very best bullets you can click here.
 |
 |
| Primer Pocket Uniformer | Flash Hole Deburring Tool |
Unless you are developing loads for bench rest shooting you shouldn't have to do anything else to ensure that your ammo is the best it can be.
Fr. Frog's Rules for Reloading
1) You don't need to wring the last
possible foot-second of velocity out of your firearm/ammunition
combination. Better an accurate, consistent load than a blue screamer
that won't hit the proverbial barn.
2) Pay attention to details, but
unless you are a bench rest competitive shooter, there is a point of
diminishing returns on the effort you put into your reloading for accuracy.
3) Changing anything changes everything.
4) Don't do anything stupid
5) Inspect, inspect, inspect.
6) Most gun writers are pathological liars
Some tricks along the way to make life easier.
Digital Scales -- Digital scales are convenient but they can suffer from drift and reading errors. You may be surprised just how inconsistent they can be, with some brands of scales varying ± .2 gr or more with the same test object repeatedly measured. I have seen some scales develop 5% or more drift during use. For critical or max loads use a balance beam scale.
Try this with your (or your friend's) digital scale. Warm it up and calibrate it according to the manufacturer's instructions. Then weigh a bullet or some other object repeatedly (say 10 times) with the object centered in the scale pan. Then repeat the test but place the object in different corners of the scale pan. It should be noted that dropping an object to be weighed into the pan-- as opposed to gently placing it in the pan--can cause a wide variance in readings. You should periodically do this test with your digital scale, because since it uses electronics rather than mechanics to weigh things it is possible for the circuitry to drift or deteriorate over time. Be safe! Check frequently!
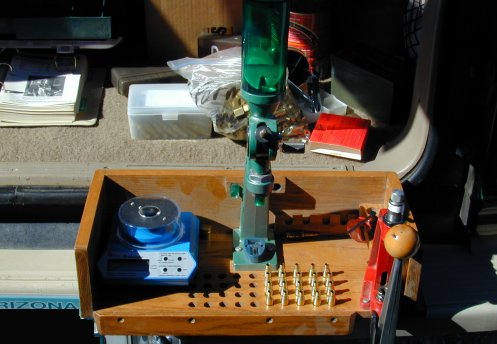
A Portable Loading Table --Besides having a chronograph one of the things that will make life easier is to assemble a small portable loading area. The picture below is probably self explanatory. The whole unit is about 12" deep and about 24" wide (dimensions and style vary) and has a series of holes drilled to hold cases. It is fitted with an inexpensive Lee brand "Reloader" press (used solely for bullet seating), an RCBS powder measure, a Dillon/CED electronic scale, and some spots for some extra seating dies and accessories. The whole assembly is very handy and travels well. It sits nicely on the back bumper of a truck, or pickup tailgate secured with strap clamps or it can sit on your shooting bench and secured with c-clamps. It is generally stable enough to just sit on a bench or tailgate. Every serious loader should have one of these. I have discontinued making them for sale due to the ridiculous shipping costs.
If you want to try building one yourself I can supply rough plans and a drilling template for the case holder and die/shellholder blocks for $5.00. The construction should be obvious from the photo and you can make it whatever size you like. You'll need a table saw and a drill press along with 3/8", 1/2', and 1" Fostner bits to drill the holes. Contact me by clicking here.
Chronograph setup--When setting up your chronograph always use the same screen spacing and distance from the muzzle for consistent results. With modern high clock speed chronographs a 2 foot screen spacing works fine. To assure some standardization always use a distance of either 10 feet or 15 feet to the center of the sky screen support which will give a "measurement distance" of 10 or 15 feet. Also, keep the chronograph electronics out of the path of direct muzzle blast.
For some tips on chronographing and possible problems click here.
Dummy Rounds--Make up dummy rounds (without powder or primer) of the proper overall length for each bullet you use. Use these rounds to set up your seating die.
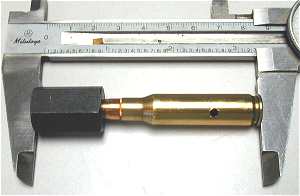
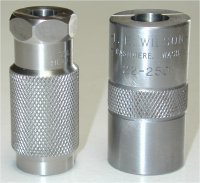
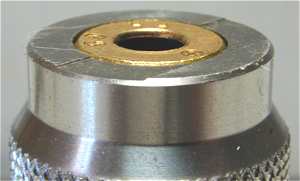
Use A Case Gauge-- Use a case gauge as sold by L. E. Wilson and Dillon to set up your sizing die. This ensures that your headspace will be correct and consistent. If a case dropped into the die has its rim between the high and low steps on the gauge your die is properly set.
 |
 |
Consistent Crimp - Get a Lee factory crimp dies for the calibers you reload. They provide a very consistent crimp which improves accuracy and are inexpensive. Just ensure that you don't over-crimp.
 |
Wave diagram courtesy Lyman
Corpoation
Photographs and seater graphic © copyright 2001 by John Schaefer
Once You Have Loaded Ammo - Repackbox makes a very nice line of cardboard ammo boxes to repack bulk ammo in. Made from a stiff white board most of the boxes are sized to hold a standard magazine's worth of ammo (30 rounds of 5.56 mm and 20 rounds of 7.62 NATO, etc.). Also available are packing aids stuff for packing magazines and survival rations. Pricing and shipping are very reasonable. Currently available for: 9MM, 10MM, 30 Carbine, 380 ACP, 357 MAG, .40 S&W, 44 MAG, 45 ACP, 45 Long Colt, 5.56 X 45 & .300 BO, 7.62 X 39, 7.62 X 51, 7.62 X 54R, 303 British (Also .30-40), 30-06, 30-30 Winchester, and 12 GA.
For further information visit their web site or contact Roger Small at 615.792.7947 or via email at rsmall (at) gijewelry (dot) com, or www.repackbox.com. Please tell Roger that I sent you.
As an aside, they also offer "made in the US" GI religious jewelry approved for issue. Made from non-magnetic, non reactive, bright finished, 100% 304 stainless steel. The chains are the beaded "dog tag" type, 24" long, and also made of 304 stainless steel. The back of each pendant is stamped with their Manufacturers "CAGE" Code: 3YWL0.
Developing Loads for Cartridges Without Published Data
Developing loads for cartridges that have no published data available can be a tricky and potentially dangerous job. The old method of measuring case head expansion has been proven to be unreliable at best. See http://www.shootingsoftware.com/ftp/dbramwell%20july%2019%2004.pdf for further details.
If you have data for a cartridge of similar case capacity and pressure data for it you can start with the loads that give pressures below that of the unknown cartridge limits and slowly work up to load giving equivalent pressure but this has to be done very carefully. If you have a pressure measuring unit like PressureTrace II you are in a much better and safer place. Start with data for a cartridge with a similar case capacity and then slowly work up from the lowest pressure loads to loads that do not exceed the unknown cartridges limits. If you are working with known caliber but using a modified non-standard chamber designs or rifling you can see what is happening and work up safe loads rather than guessing. The loading data for the DMR chamber design for the 6.8 x 43 mm (6.8 SPC) was developed using a PressureTrace II unit. You can get more information on the PressureTrace II by visiting www.shootingsoftware.com/pressure.htm.
Please email comments to Fr. Frog by clicking here.
| Back to Fr. Frog's homepage |
Disclaimer
As far as I know all the information presented above is correct and I have attempted to ensure that it is. However, I am not responsible for any errors, omissions, or damages resulting from the use or misuse of this information, nor for you doing something stupid with it. (Don't you hate these disclaimers? So do I, but there are people out there who refuse to be responsible for their own actions and who will sue anybody to make a buck.)
![]()
Updated 2019-03-12