This section contains brief discussions of various ballistics and shooting related topics as requested by correspondents. If you have a question you have been trying to find an answer to (keep 'em ballistics and shooting related--see your minister for the mysteries of life) email me by clicking here and I'll do my best to find the answer for you and if it is of general interest, publish it here. If you can contribute additional input to one of the answers I'd would appreciate hearing from you too.
Check back frequently as new topics are always being added.
On this page:
How does tracer ammunition work?
What is "magnum" ammunition?
What is parallax error?
How do I adjust the eye piece focus of my scope?
Can you recommend any inexpensive target stands
for
practical shooting practice or matches?
Is there an inexpensive way to make reactive targets?
What is the composition of the various alloys used for casting
bullets?
Q. How does tracer ammunition work?
A. Tracer ammunition uses bullets made with a recess in their base which contains a compound that will create a bright light when ignited by the powder gases when the cartridge is fired. Tracer ammunition is primarily used in automatic weapons to allow the firer to visually walk his fire into the target and is usually used in a 1 tracer to 4 or 5 ball rounds mixture.
There are three basic types of tracer ammunition, bright trace, subdued bright trace, and dim trace . The standard "bright" tracer starts burning at the muzzle, while the subdued bright tracer doesn't burn at full brightness for a hundred or more yards (to help avoid giving away the firer's position), and the dim tracer gives a very dim visible trace that is hard to see with the unaided eye but which is visible with night vision equipment.
In US /NATO practice tracer ammunition is identified by a red (traces from the muzzle), orange tip (delayed trace), and violet tip (dim tracer visible with NVG equipment) .
Warning. While tracer ammunition is not designed specifically to have an incendiary effect, it is capable of starting fires and should only be used under controlled conditions.
Q. What is "magnum" ammunition?
A. Originally the term "magnum" was used by champagne makers to describe a very large bottle of their product. The term was picked up by some gun makers to denote a cartridge with a large capacity case and greater than "normal" power levels and that practice carried on to today. The term has become imbued with an almost magical status for some folks-- giving visions of earth shattering power. In fact there are many non "magnum" cartridges of greater power than some "magnums."
As an example of magnumizing we can look at the .38 Special / .357 magnum and the .44 Special / .44 magnum. The cases of both the 357 and .38 Spl, and .44 Spl and .44 Mag are identical between the standard and magnum versions except for the length of the case. (While "magnum performance could be obtained from the standard length case, the case was lengthened to prevent its use in firearms not approved for the extra pressure.)
| Case length (in) | Typical velocity (f/s) | Operating pressure (psi) | |
| .38 Special 158 gr | 1.155 | 850 | 17,000 |
| .357 Mag 158 gr | 1.290 | 1250 | 35,000 |
| .44 Spl 240 gr | 1.160 | 980 | 15,500 |
| .44 Mag 240 gr | 1.285 | 1450 | 36,000 |
Q. What is parallax error?
A. Parallax error is an optical aberration of telescopic sights in which the point of impact can vary with eye placement. It is caused by the fact that the target does not fall on the same optical plane as the reticle. It is of primary concern for very precise shooting, such as shooting for group. Most fixed focus hunting scopes are focused at about 150 yards so if your target is at a different range you can get parallax error if your eye is not centered in the cone of vision consistently.
Maximum parallax error occurs when your eye is at the very edge of the exit pupil and for a 4x hunting scope focused for 150 yards the maximum error would be about 1" at at 500 yards if your eye was fully off center--giving the possibility of a 2 inch combined error if your eye placement varied from side to side of the field of vision. At short distances the 4x scope above would have about 2/10" error (4/10" total combined error) at 100 yards. Thus parallax error is primarily a worry for shooting groups but not in the field.
Some scopes have an adjustable objective lens that will allow you to adjust the plane of focus to your target's approximate distance thus minimizing parallax error. If your scope does not have parallax adjustment it is important to consistently place your eye in relation to the scope.
Typically, non adjustable scopes are set for the following parallax free ranges. Consult your owner's manual to verify this data for your scope.
Rifle scopes - 150 yards
Handgun scopes - 100 yards
Shotgun scopes - 75 yards
Rimfire scopes - 60 yards
Q. How do I adjust the eye piece focus of my scope?
A. The easiest way to do this is to first ensure that your firearm is unloaded and point in at a distant object. Then briefly look away from the eye piece and then look back through it. Repeat this process while adjusting the eyepiece until both the reticle and the object appear sharp at the same time. The reason you have to repeatedly look away from the eye piece is that your eye will try to bring both the reticle and object into focus if you stare through the scope, causing eye strain and contributing to parallax error.
Q. Can you recommend any inexpensive target stands for practical shooting practice or matches.
A. The cheapest way to acquire free-standing target stands is to make them. Many years ago John Martyn, of the New Jersey Combat Pistol League a club that I founded and ran, came up with inexpensive targets stands that were literally stapled together from 1" x 2" furring strips, cardboard pieces, and scrap lumber. They were used with cardboard IPSC targets or paper targets on a cardboard backer. We turned these out in great quantities for our 60 member club and they were also used by several other clubs with great success.
The original bases were nailed together and used formed metal strapping to hold the uprights, but this modification using wood channels works better and is cheaper. If a frame's uprights got shot up they were cut into spare cross pieces. Several of our members picked up left over furring strips from construction sites and you can probably scrounge some up for free too, although they are very inexpensive to buy. Try bargaining with a lumber yard for left-overs or damaged ones. Corrugated cardboard boxes are everywhere for the asking and the pieces can be cut to size on a circular or band saw. We kept a box of "parts" handy for fast repair during matches.
|
Tools needed
For each target holder you will need
For each target foot (2 per holder) you will need (exact dimensions are not required)
|
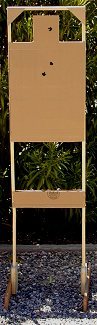 |
You can alter the width of the target holder cross pieces to make a holder for typical bullseye and sighting in targets instead of silhouettes.
Target Holder Directions
 |
 |
 |
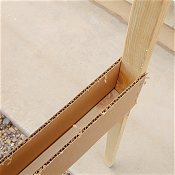 |
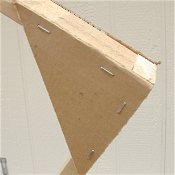
| Stapling detail | Corner brace | Corner brace | Horizontal tray |
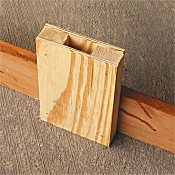
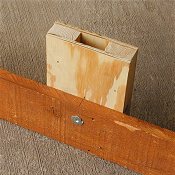
Target Feet Directions
You can get away using only one foot per target but two are better. In windy conditions you can hold the feet in place with rocks, sand bags, or whatever.
 |
 |
|
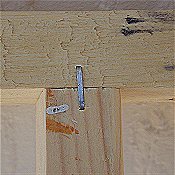
Foot detail |
Securing screw T nut |
You can, if you'd like, drill a hole through the horizontal piece of the foot into the vertical channel and insert a small (10-24) T-nut so you can secure the uprights in the holder with a short screw for easy moving about the range without the feet falling off.
And speaking of the old New Jersey Combat Pistol League.... If you are a patch holder I'd love to hear from you and reminisce about the "good old days" before the "gamesmen" appeared.
Q. Is there an inexpensive way to make reactive targets
A. I've come up with a method that seems to work well. I used the target stands described above with some simple modifications, but you could use whatever you have on hand with a little imagination.. In addition to the stand you'll need cardboard targets, about 2' of heavy string, some small spring binder clips, a small nail, balloons, light string, and tape.
Frame Modification
Secure the piece of cord across the stand about 32" below the top of the
stand either with staples or whatever. Leave some slack in this
string. Drive small nails into the rear
center of the top cross bar of the frame and the sides (at the top of the
"A" zone and the head zone), letting them stick out enough to tie
string to.
Target Modifications
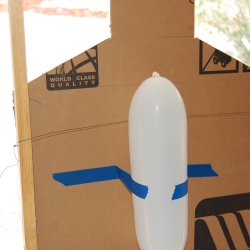
Inflate some balloons. Use ones about 4" in diameter for a head shot
and either 6 to 8 inches in diameter or a long balloon about 4" by
10" for the "A" zone. For a COM reactor tape the large balloon to the
rear side of the center
of the target's "A" zone. For a head shot target tape the
4" balloon behind the head zone.
Using two binder clips clip the lower edge of the target around the string on the frame. Then attach the string to the nail on one side of the frame's cross piece, run it between the balloon and the target, allowing the target to angle forward a little bit, and tie to the nail on the other side of the frame. Go shoot. When the balloon is popped the target will pivot forward and the target will fall. (Depending on conditions you may want to cut the bottom corners of the target at an angle to allow the bottom to pivot inside of the target frame as it falls.
It has been suggested to use a strip of cardboard instead of the string between the balloon and target to prevent the target from falling if the string were accidentally hit outside of the balloon area.
Another option is to just suspend the target from the top of the frame with the balloon/string without fastening to the cord on the frame (only works in non-windy conditions). When the balloon pops the target will drop. You could add some kind of a simple flange to keep the target from flopping in the breeze that would still allow the target to drop.
I have also seen a setup where a rectangular box or a cardboard tube is attached to the back of the target and the inflated balloon inserted (or inflated inside) the container. The target is suspended from the frame by a string tied to the balloon. When the balloon is popped the target just drops.
Use your imagination. If you come up with a better or easier idea email me and let me know by clicking here.
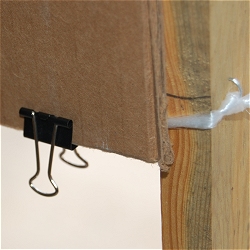 |
 |
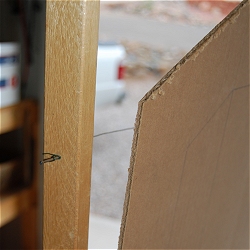 |
| String and binder clip | Balloon with string between it and target | Target lean to ensure fall |
Q. What is the composition of the various alloys used for casting bullets?
A. The table below gives the approximate composition of various common alloys and their Brinell hardness. Note that more tan about 4% tin has little effect on hardening. Tin's primary use is to improved the flow of the alloy so that the alloy completely fills the mold and gives sharp edges.
| Alloy | %Tin | %Antimony | % Lead | Brinell Hardness |
| Annealed and Quenched wheel weight alloy | 2.5 | 3 | 94.5 | 36 |
| Monotype | 9 | 19 | 72 | 28 |
| Quenched wheel weight alloy | 2.5 | 3 | 94.5 | 28 |
| Stereotype | 6 | 14 | 80 | 23 |
| Linotype | 4 | 12 | 84 | 22 |
| Lyman #2 | 5 | 5 | 90 | 15 |
| Wheel weights +2% tin | 2.5 | 3 | 94.5 | 13.5 |
| Wheel weights | .25 - .5 | 3 | 96.5 | 12.5 |
| Electrotype | 3 | 2.5 | 94.5 | 12 |
| 1:10 Tin/Lead | 9 | - | 91 | 11.5 |
| 1:20 Tin/Lead | 5 | - | 95 | 10 |
| 1:30 Tin/Lead | 3 | - | 97 | 9 |
| 1:40 Tin/Lead | 2.5 | - | 97.5 | 8.5 |
| Pure Lead | - | - | 100 | 5 |
Please email comments to Fr. Frog by clicking here.
| Back to Q&A Index | Ballistics Main Page
| Back to Fr. Frog's Home Page |
Disclaimer
As far as I know all the information presented above is correct and I have attempted to ensure that it is. However, I am not responsible for any errors, omissions, or damages resulting from the use or misuse of this information, nor for you doing something stupid with it. (Don't you hate these disclaimers? So do I, but there are people out there who refuse to be responsible for their own actions and who will sue anybody to make a buck.)
![]()
Updated 2008-07-29